跳到主要內容

Free SSL Certificate Setup for WordPress on Google Cloud (Click-to-Deploy)

1. Connect to WordPress via SSH


ssl certificates wordpress on google cloud access menu
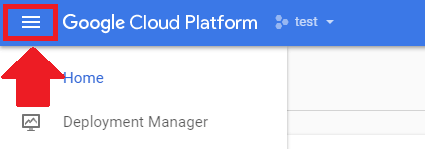
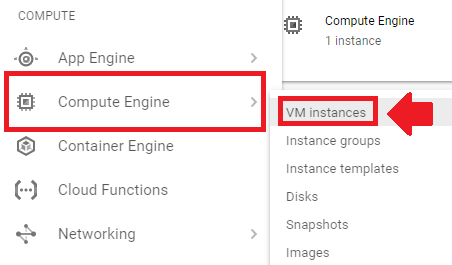
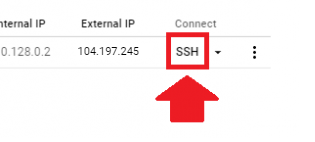
Go to your Google Compute homepage and click the hamburger menu in the upper left-hand corner.
ssl certificate for wordpress on google cloud go to compute engine then vm instances
Go to your Compute Engine, then to VM instances to access your WordPress installation.
Click the SSH button to connect to your website’s server.

2. Install CertBot Client


ssl certificate setup wordpress google cloud click to deploy
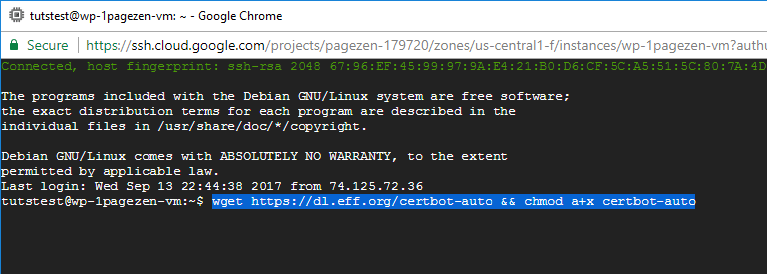
Now that you’ve connected to your website’s Apache server, you are going to execute the command to install the Certbot client. The Certbot client is used to issue the SSL certificates that will be used later on in this tutorial.

wget https://dl.eff.org/certbot-auto && chmod a+x certbot-auto
After executing each of these commands, you can either stay in the same SSH window or exit and open a new one.

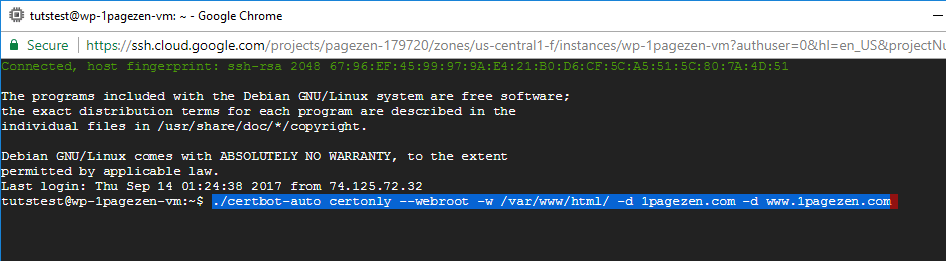
3. Generate Certificates


ssl certificate setup wordpress google cloud click to deploy
In this step you are going to execute the command below in order to tell the Certbot client to create SSL certificates for your website. Remember to replace 1pagezen.com with your own domain name.

./certbot-auto certonly --webroot -w /var/www/html/ -d 1pagezen.com -d www.1pagezen.com

ssl certificate setup wordpress google cloud click to deploy
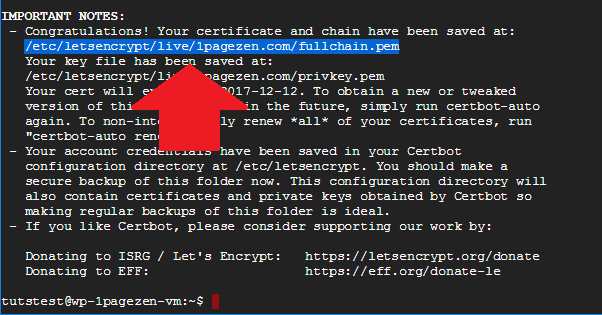
After executing these commands, your certificates will be generated. Take note of the directory where your certificates are installed.

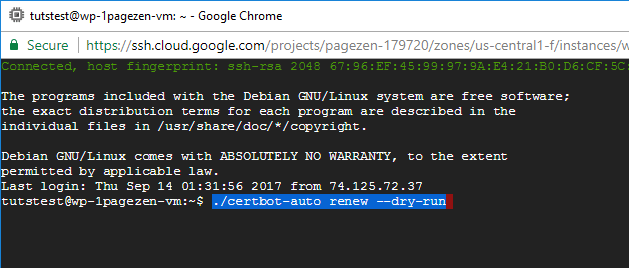
4. Test Certificate Renewal


ssl certificate setup wordpress google cloud click to deploy
Before setting up auto-renewal for your certificates, you are first going to execute the commands below in order to test the auto-renewal function.

./certbot-auto renew --dry-run

ssl certificate setup wordpress google cloud click to deploy
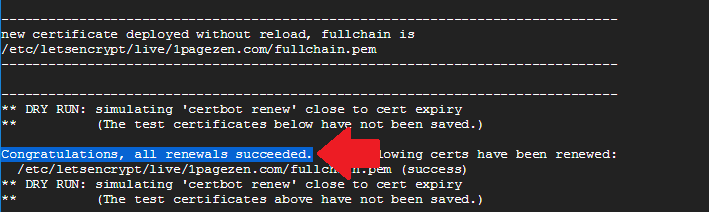
If you get a success message, it means that the certificates are renewing properly.

5. Setup Auto-Renewal

Important Notice: The auto-renew configuration instructions outlined in this section are no longer valid. For updated instructions on configuring auto-renewal, click here.
(It is recommended that you skip to step 6 and finish this tutorial first).

ssl certificate setup wordpress google cloud click to deploy
In order to program your certificates to automatically renew themselves, you need to configure a crontab that will automatically renew the SSL certificates before they expire.

sudo crontab -e

ssl certificate setup wordpress google cloud click to deploy
After executing the sudo crontab -e command, choose the text editor to use to create the crontab. Nano (1) is the easiest text editor to use.

1

ssl certificate setup wordpress google cloud click to deploy
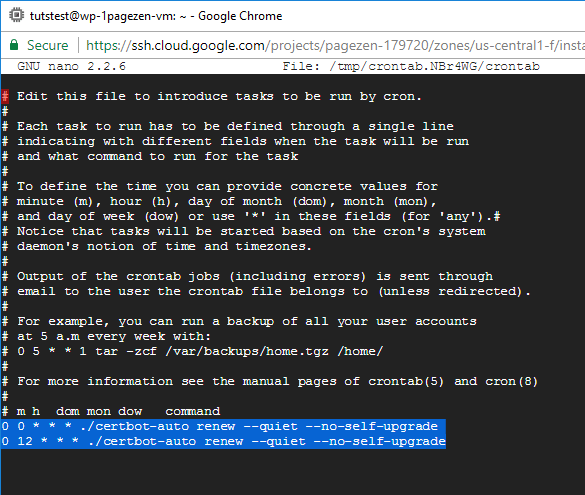
Now that you’ve created a new crontab file, scroll to the bottom and paste the commands listed below. The command will tell Certbot to check for renewals twice per day.

0 0 * * * ./certbot-auto renew --quiet --no-self-upgrade 
0 12 * * * ./certbot-auto renew --quiet --no-self-upgrade
After adding this code, enter ctrl+o to save changes, followed by ctrl+x to exit back to your home screen.

6. Configure the Certificates


ssl certificate setup wordpress google cloud click to deploy
The next step is to configure your certificates. First, execute the command below to open your default-ssl.conf file for editing.

sudo nano /etc/apache2/sites-available/default-ssl.conf

ssl certificate setup wordpress google cloud platform compute engine click-to-deploy
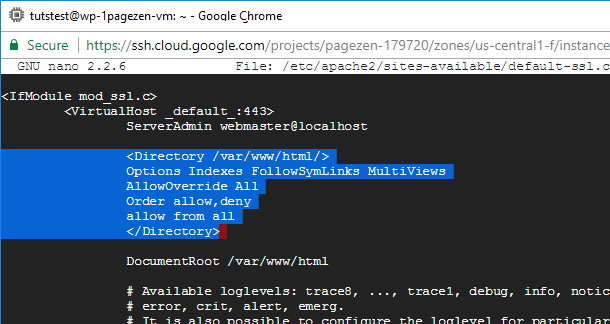
At the top of the default-ssl.conf file, paste the following lines of code in order to tell your server to direct network traffic to HTTPS port 443.

<Directory /var/www/html/>
Options Indexes FollowSymLinks MultiViews
AllowOverride All
Order allow,deny
allow from all
</Directory>

ssl certificate setup wordpress google cloud click to deploy
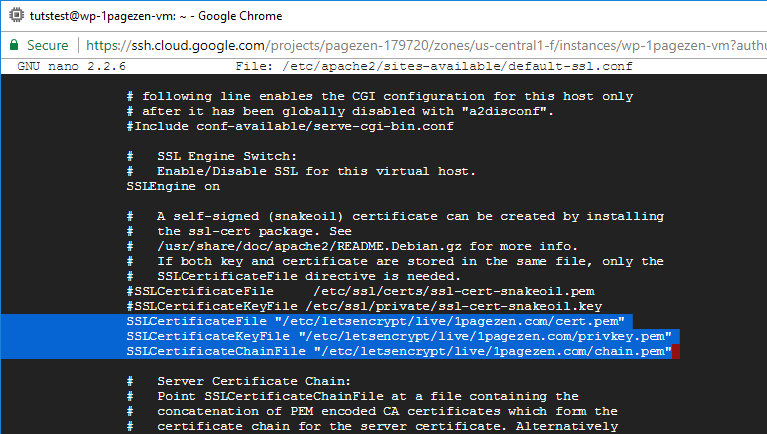
The next step is to use the down-arrow key to scroll down towards the bottom of the default-ssl.conf file. Place a # sign next to the existing snakeoil certificates, and paste the path to your three SSL certificate files as shown in the command below, making sure to replace 1pagezen.com with your own domain name.

SSLCertificateFile "/etc/letsencrypt/live/1pagezen.com/cert.pem" 
SSLCertificateKeyFile "/etc/letsencrypt/live/1pagezen.com/privkey.pem" 
SSLCertificateChainFile "/etc/letsencrypt/live/1pagezen.com/chain.pem"
After adding this code, enter ctrl+o to save changes, followed by ctrl+x to exit back to your home screen.

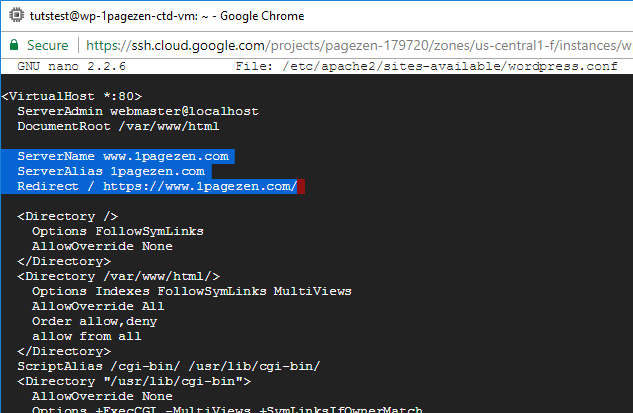
7. Enable HTTPS Redirect


ssl certificate setup wordpress google cloud click to deploy
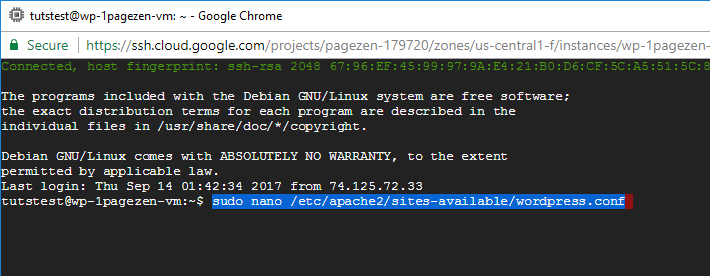
The next thing you will do is configure your Apache server to only serve the HTTPS version of your website. To do this, you will edit your wordpress.conf file, which you can access by executing the command below.

sudo nano /etc/apache2/sites-available/wordpress.conf

ssl certificate setup wordpress google cloud platform compute engine bitnami
Once inside of the wordpress.conf file, you will add the code below to tell your server to only serve the HTTPS version of your site. Remember to replace 1pagezen with your website's domain name. (Update 03/08/2018: 'permanent' added to code to mark redirect as a 301 instead of 302).

ServerName www.1pagezen.com 
ServerAlias 1pagezen.com 
Redirect permanent / https://www.1pagezen.com/
After adding the code to your wordpress.conf file, enter ctrl+o to save your changes and ctrl+x to exit the wordpress.conf file.

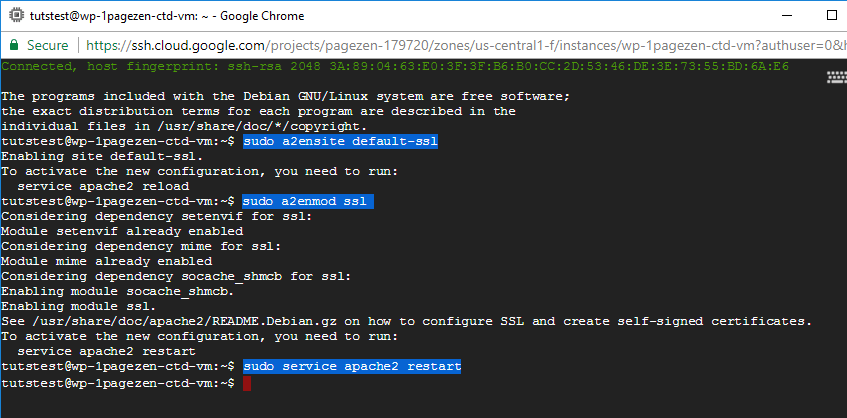
8. Restart the Apache Server


ssl certificate setup wordpress google cloud platform compute engine bitnami
In order for your certificate changes to take effect, you need to update/restart you Apache server by executing all three of the commands listed below.

sudo a2ensite default-ssl 

sudo a2enmod ssl 

sudo service apache2 restart

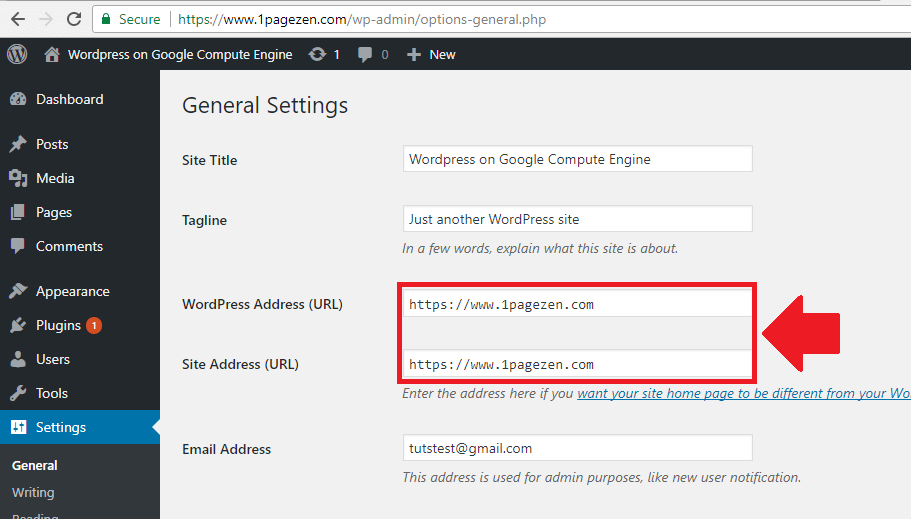
9. Update WordPress URLs


ssl certificate setup wordpress google cloud click to deploy
The last step in this tutorial is to go into WordPress > Settings > General, and replace your current domain name with the https:// version. Click to save changes. If your SSL certificate isn't working, check your configuration at www.ssllabs.com/ssltest/.

留言

這個網誌中的熱門文章

艾爾日配檔及教學 (更新至艾拉小魔版本2014-2-2)

連結檔案 : 2-2-2014 日服艾拉小魔配音更新 JP.RAR 壓縮檔下載 data069.kom: 蕾娜鎖二語音修正 data092.kom:愛莎語音 data093.kom:艾索語音 data094.kom:伊芙語音 data095.kom:蕾娜語音 (本人利用日版檔案重新分配) data096.kom:NPC語音(含沙德) data097.kom:雷文語音 data104.kom:怪物語音(含沙德) data109.kom:澄語音 data133.kom:艾拉語音 data134.kom:艾拉語音 data144.kom:愛利西斯 語音 data145.kom:愛利西斯 語音 069這個檔案是主管遊戲技能音效的。 夜襲部分日配 NW的鎖二以及ZXXX都是韓配的「嘿呀!」衝過去 日版NW的鎖二有語音,而ZXXX最後一下則是無任何語音 但是台版不巧的這兩個檔案都是讀取069內的某個音效檔 簡單說就是這兩個只能用同個音效! 資料來源至:  連結 但這個檔案跟他弄的不同。這檔案我把原本的鎖二語音弄進去了。 轉配音教學 (手動):  1. 先將日配檔改副檔名做 .JP 2. 將.JP檔放在DATA FILE目錄 3. 建立BAT 檔轉換檔案 (把.JP 轉名做 .KOM) 4. 開啟遊戲,出現 Hackshield 圖示時執行 BAT 檔 5. 最後結束遊戲時或下次執行遊戲前 執行 還原 BAT檔

Pokemon Sun Moon 招式 TM 獲得地點表

編號 中文名稱 獲得地點 截圖 TM01 自我激勵 好奧樂市打敗訓練師學校的4名訓練師後獲得 TM02 龍爪 波尼大峽谷,進行試練之處獲得 TM03 精神衝擊 日輪湖 TM04 冥想 海洋居民之村寶可夢中心購買 TM05 吼叫 卡拉蔚灣 TM06 劇毒 以太樂園 TM07 冰雹 皇家巨蛋寶可夢中心購買 TM08 健美 可霓可市購買 TM09 毒液衝擊 可霓可市購買 TM10 覺醒力量 歐哈納牧場飼育屋 TM11 大晴天 皇家巨蛋寶可夢中心購買 TM12 挑釁 13號道路大篷車朋克青年 TM13 冰凍光束 卡璞村與寶可夢聯盟連接洞穴 TM14 暴風雪 海洋居民之村寶可夢中心購買 TM15 破壞光線 海洋居民之村寶可夢中心購買 TM16 光牆 慷待市寶可夢中心購買 TM17 守住 慷待市寶可夢中心購買 TM18 求雨 皇家巨蛋寶可夢中心購買 TM19 羽棲 馬利埃靜市精靈中心購買 TM20 神秘守護 慷待市寶可夢中心購買 TM21 遷怒 馬利埃靜市馬莎琪店(夜晚找智揮猩對話) TM22 日光束 海洋居民之村寶可夢中心購買 TM23 擊落 馬利埃靜市精靈中心購買 TM24 十萬伏特 波尼曠野 TM25 打雷 海洋居民之村寶可夢中心購買 TM26 地震 終結洞窟(成為冠軍後,需要肯泰羅) TM27 報恩 馬利埃靜市馬莎琪店(夜晚找智揮猩對話) TM28 吸血 9號道路 TM29 精神強念 以太樂園博士贈與 TM30 暗影球 14號道路 TM31 劈瓦 蔥鬱洞窟 TM32 影子分身 可霓可市購買 TM33 反射壁 慷待市寶可夢中心購買 TM34 污泥波 海洋居民之村寶可夢中心購買 TM35 噴射火焰 波尼大峽谷(需要怪力) TM36 污泥炸彈 可疑宅邸 TM37 沙暴 皇家巨蛋寶可夢中心購買 TM38 大字爆炎 海洋居民之村寶可夢中心購買 TM39 岩石封鎖 7號道路 TM40 燕返 馬利埃靜市精靈中心購買 TM41 無理取鬧 5號道路 TM42 硬撐 馬利埃靜市精靈中心購買 TM43 蓄能焰襲 8號道路阿克羅瑪贈與 TM44 睡覺 超值超市裝扮成引夢貘人的男子 TM45 迷人 豪諾豪諾度假地旅館裝扮成怪力的男子 TM46 小偷 蔥鬱洞窟(需要肯泰羅) TM47 下盤踢 可霓可市購...

寵物小精靈 Sun/Moon

目錄  一、3DS相關 3DS Q&A 各語言各型號3DS使用說明書 如何透過電腦管理NN3DS上的SD卡? 二、語言及遊戲購買相關 分辨行/水版 其他問題 三、精靈銀行 Pokémon Bank 操作教學 四、版本更新 五、操作及基本知識 Alola圖鑑+數值+特性表 捕捉率 (英文) 進化條件 重置遊戲 (洗save) 重開遊戲 (reboot) 如何與朋友連線 QR 日月全精靈QR碼 島SCAN可遇的精靈 瑪機雅娜 六、攻略 特殊地點及NPC 1島卡拉蔚灣(1島地圖右上海域) 2島燈塔 豐收遺跡(草守神) 改名 遺忘技能 回憶技能 醒力鑑定 個體鑑定 親密度鑑定 努力值鑑定 ID抽獎 剪頭髮&時裝 圖鑑獎勵 改變戰鬥風格 Z神細胞位置 專有技能教學 道具位置 TM (招式機)位置 非主線劇情取得的Z純晶 進化道具位置 Mega/原始回歸相關 其他道具及金銀球(Bankball)資料 精靈獲得/進化/形態相關 送給玩家的精靈 個別精靈捕獲方法 準神獸 UB位置 精靈進化地方 精靈形態轉換 圓慶廣場 基本知識 不同對白該到的店 店鋪功能 參考資料 洗廣場店鋪流程 精靈度假地 島嶼用途 連鎖 連鎖獎勵(個體、夢特) 百變怪連鎖法 七、廢人之路 培育入門(新手必睇) 同步特性 紅線/努力值狗帶/不變石 百變怪位置 蛋符閃符 蛋路 火焰身驅(孵蛋步數減半) 個體鑑定及醒力鑑定 訓練努力值 極限特訓 快速賺錢/升100lv方法 八、與前代不同之處 精靈種族值 精靈特性 招式改變 異常狀態 道具 Mega出招順序判定調整 遺傳球種 九、特別體驗版 下載 與Sun/Moon聯動 十、週邊遊戲 免費/課金 Pokémon Go ポケとる / Pokémon Shuffle みんなのポケモンスクランブル / Pokémon Rumble World ポケモンピクロス / Pokémon P...